HomeThrough The LensStyle WatchLet's BoogieLive Love Create

Saturday, March 17, 2012

Improv Everywhere: Making people smile one crazy antic at a time

In my journey's across this vast internet land, I've discovered a very beautiful and pleasant place (blog) by a super inspiring and cheerful lady, Katie (see Color Me Katie and her fabulously inspiring blog). 

She is part of a group in New York City called Improv Everywhere. This is basically a dedicated group of people who put on lively pranks for the smiles  and laughter of New Yorkers and tourists in random spots around the city. 
Check out some of their Improv Everywhere youtube videos below to see what I'm talking about:


At any rate, I was really excited to hear that because of the rapid success of Improv Everywhere (thanks to a little thing called Youtube) they've reached their kickstarter goals and they've been given the green light to make a full length documentary about these fun pranks and their origins.

Check out the trailer for the feature length documentary here!!

Wednesday, March 14, 2012

Style Watch: Colorful Stripes

Ahh, the days are longer and warmer, and the sweet smell of flowers and barbecuing fills my neighborhood. 
It must be springtime!
 In lieu of the changing of the season and the brightening up of clothes in stores I thought I'd point out my favorite trend right now: 

Colorful Stripes.  

Starting off with my favorite fictional fashionista: Carrie Bradshaw
Carrie Bradshaw ( per usual) standing the test of time with her colorful rainbow skirt.

Below are some other ideas to dress up bright colorful stripes for a night on the town  or  down for a
day at the beach.


Monday, March 12, 2012

Carrie Bradshaw's Apartment: FOR SALE!

It's no secret I'm a huge Sex and the City and Carrie Bradshaw fan. Her style and charm have stood the test of time in my heart and the heart of the public. If you're a fan of the show then you're well aware of how iconic her apartment and her apartment's stoop is in the pop culture realm.


Well, bestill my fangirl heart her apartment is now up for sale!

64 perry street in the West Village ( in the show it was supposed to be located in the Upper East Side) is now up for sale for a measly 9.6 million. Guys- NINE POINT SIX MILLION DOLLARS.

ouch.

Apparently, the real apartment is not just a one bedroom walk-in with a charming walk through closet but a private home with 5 bedrooms, 3 bathrooms, and 6 (yes.. SIX) fireplaces with no mention on the realtors site about closet space (carrie bradshaw would be appalled..)

Still, for me it's not about what's on the inside of Carrie's apartment, but I'll always be fond of her stoop...

where she had her lovers...

and she had her friends...


and I had my New York moment...
<3

Sunday, March 11, 2012

My New Favorite Flats: Cocorose London


Thanks to one of our lovely readers Janan Leo, founder of Cocorose London, a FABULOUS shop who sells these super stylish fold-able flats I have found my new favorite pair. Since these little darlings fold-up and come with their own little bag (see 4th picture), I thought I'd love to have these for post-dancing when my feet are yelling at me from wearing heels all night. However, once they arrived I knew I couldn't wait for that post-partying moment and decided to wear them to work. Let me tell you, I not only got a lot of compliments on them this past week but I feel like I'm walking on air! Below are a picture of my fold-able flats. 

The one's I ordered are "Glamour Glitz Dusk Gem" 


I am definitely ready to already expand my Cocorose London Fold-able Flat's collection and I'm thinking of these bad boys next...
They're called "Parisian Panache" and I think that is just about perfect. 


Check out more of their adorable styles for work and play here:

Monday, February 6, 2012

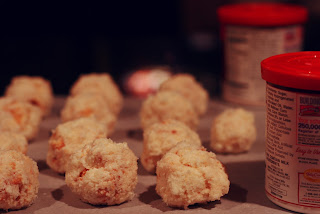
Delicious, Colorful Cake Balls!

I'm not much of a cook and making these funky & fun cake balls is a breeze, even for me. So here's how it goes...


Things you need:
-1 box of cake mix (and whatever ingredients you need for this- normally 3 eggs, 1.5 cups of water and 2/3 cups of cooking oil)
-1/2 container of fluffy vanilla frosting
-Candy coating (However many colors you want to use. You can also use food dye)
-Sprinkles/ dessert toppings (This is where you can get creative!!)


Step 1- Bake the Cake! Mix together your ingredients and throw it in the oven.


Step 2- When you take the cake out, cut it so that it cools faster. It doesn't matter what the cake looks like, since you're gonna be turning it into BALLS! Now let that cake cool (I tried this run with angel food cake- it was pretty delicious).
Step 3- Once the cake cools, crumble the cake entirely into a new bowl and mix in 1/2 of a container of frosting.
Step 4- Roll the frosting/cake mixture into little balls and put them in the freezer. FOR BEST RESULTS, LEAVE THEM IN THE FREEZER FOR 24 HOURS, but you can take them out to decorate as soon as you'd like. I've done it in as soon as an hour, but sometimes the balls fall apart in the candy coating if they're not frozen.


Step 5- Melt the candy coating in the microwave until it mixes smoothly. I normally do this for about 30 seconds, mix it, and then 30 more seconds. Mix colors together, add food coloring, but be careful- this can get messy!


Step 6- Top your cake ball with desired (or funky, monster-like) toppings! 


Piece of advice- I like to put it on a plate and decorate it, but it dries fairly quickly, so maybe put it on wax paper to let it dry and top it off there!

That's it! Happy Cakeballing! 

Vintage Valentine Giveaway!

It's the month of love so I figured I'd combine this month's giveaway with our love of all things old and cute.
This week we are giving away 7 vintage valentine's day cards
Some of these date back all the way to the 70s!
Just leave a comment, saying anything (hi, we love you, we hate you, I read this blog secretly etc etc) 
and you'll be entered.
This giveaway is a quick one. I'm going to end it Thursday at Noon (MST) so that I can mail them and get them to you in time for V-DAY!
:)


MUAH! and Good Luck!

<3 

Sunday, February 5, 2012

Party SHOES!!

With the weather warming up a bit we are adding some new items to our Etsy Shop! 
Each post will be a different section of clothes,let's boogie! 

Let's start with our namesake and begin with some of the funky, fun shoes added to our shop:

1. Sticking to the color blocking trends mentioned  in fall trends here and spring trends here, we have Vintage 1980s Color Block Size 9.5 High Heels! 


2.  Next up, we have these Vintage 1980s sequined party dancin and prancin high heels! (Size 6.5B)


3. Vintage 1960s Mod Navy Blue and Red Pumps Sized 8.5


Click here to own these shoes and MOD UP YOUR LIFE

Saturday, January 28, 2012

SATURDAY DIY: Paper Pinwheel Flower Bouquet

Happy Saturday!
One of my favorite people, Tiffany, from one of my favorite Etsy stores and blogs ( Kitten Paws Vintage), suggested we start doing more DIY projects again and I'm more than happy to oblige! 

I figured since it's (almost) spring and these are all the rage at weddings right now I'd do the Paper Pinwheel Flower Bouquet.
This project is SUPER easy and is the perfect gift if you're looking for something sweet but unconventional.
Also, another upside is they won't wither and die in three days! ZING!

First, collect colored paper or appropriately themed paper
Next, collect your supplies: 1. Brads (I got mine at the local craft store) 2. Plant stakes (local craft store) 3. Scissors 4. Hot glue (optional) 5. Not Pictured: Hole Punch (optional)

Let's get down to crafting! Cut the paper into a square. It can be either 2x2in, 3x3in, etc. For this project I did 2x2in but most people prefer 3x3in. 

Fold the paper corner to corner, and then again (with the opposite corners) corner to corner til it looks like the picture below:

When you unfold it, it should have folds in the paper that look like below as a cutting guide. Next, use your scissors and cut each fold 1/2 to the middle. 

Once you've made your cuts, it should look like the picture below

Next, use the hole punch or scissors to make a small hole in the left side of each triangle and one in the middle  of the square
Next, pull each corner with the hole in it towards the middle and put the brad through it: as shown below


After, you've put the brad through each of the holes in the triangles, push it through the hole in the middle of the pinwheel to fasten it. 


Next, place the plant stack against the back of the brad

Then, fold the back of the brad over the plant stack to secure it. (use hot glue if you feel it needs extra securing!)

Voila!


Here is a bouquet of these I made back in August for one of my best friends birthdays with some lollipops thrown in:


Now onto a photoshoot for the Etsy Store.
I hope whatever your Saturday holds it's equal parts relaxing and fun!